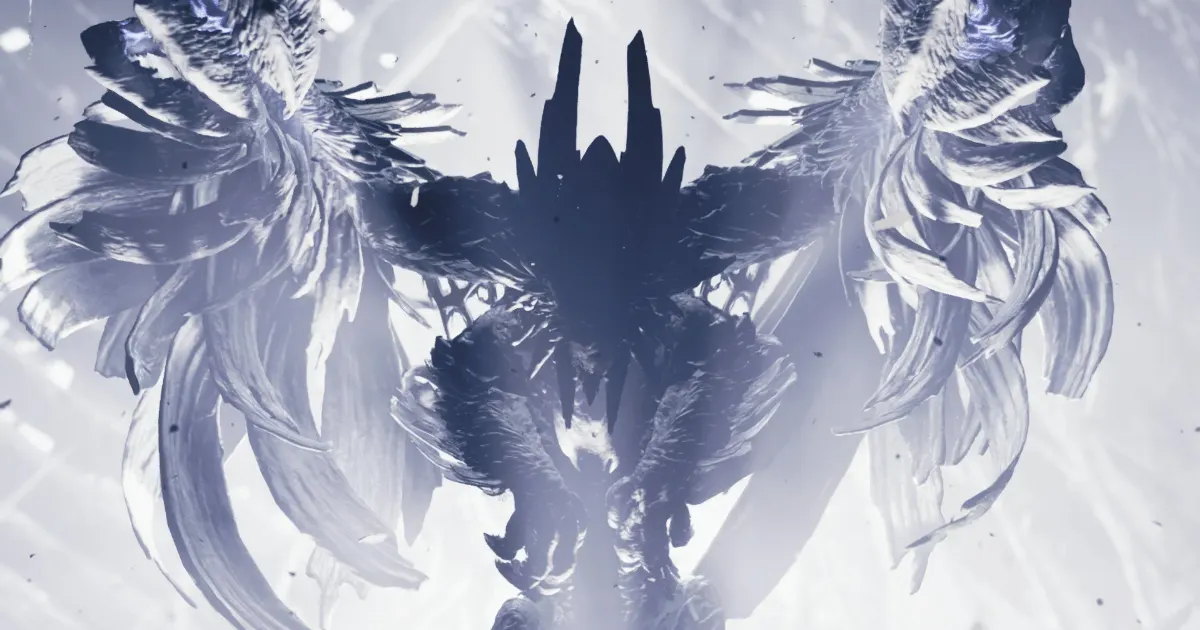
Monster Hunter Wilds revolves around defeating powerful creatures and crafting superior gear from their remains to tackle even greater threats. This progression cycle flows smoothly until hunters encounter Zoh Shia, a formidable adversary that presents a significant challenge. The initial encounter serves as a tough obstacle, while the High-Rank version becomes an exhausting trial. Whether facing this constructed beast for the first time or the tenth, understanding its mechanics proves essential for success.
How to Farm Zoh Shia
The first encounter with this artificial creature occurs at the conclusion of chapter three, serving as the final Low Rank challenge. The second opportunity arises upon reaching Hunter Rank 50, when speaking with Werner initiates a story quest titled “An Unexpected Summons” that centres around its return. Unlike other monsters, no optional quest becomes available afterward for easy replay sessions.
Despite this limitation, farming the monster and collecting its materials for impressive armor and weapons remains possible through several methods:
Wait for random appearances in Wyveria during Inclemency seasons, using rest periods to increase spawn chances. Save encounters as investigations to fight up to three times, requiring initial appearances in Wyveria. Join other hunters through SOS Quest filters to assist in takedowns.
Notably, Zoh Shia doesn’t physically manifest in Wyveria like other creatures. Similar to Jin Dahaad, hunters must wait for Environment Overview notifications before challenging them. The resulting hunt occurs on a separate map at the Dragontorch Shrine.
Understanding Zoh Shia’s Weaknesses
Every encounter with Zoh Shia guarantees a demanding battle. The creature utilizes multiple elements and unleashes some of the game’s most devastating attacks. However, exploiting specific weaknesses provides significant advantages:
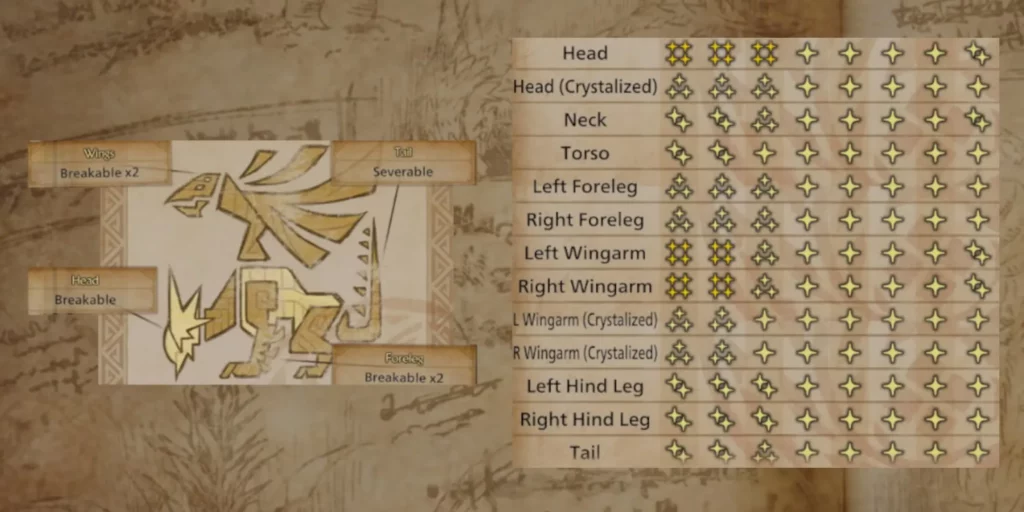
Elemental Vulnerabilities: Dragon element proves most effective Weapon Effectiveness: Both cutting and blunt damage types work well Breakable Components: Head, both forelegs, tail (severable), and both wings Status Ailment Susceptibility: Blastblight, Paralysis, Poison, Sleep, and Stun (reduced effectiveness)
Mastering the Crystal Mechanic
This hunt features a unique mechanic recognizable from certain Wyveria map locations. Zoh Shia’s attacks generate crystals that become charged with Fire or Thunder energy. These crystals explode shortly after charging, delivering elemental damage to nearby hunters and potentially triggering chain reactions with adjacent crystals.
Hunters can turn this mechanic to their advantage by using slingers to shoot crystals with Dragon and Thunder pods, causing explosions that inflict corresponding elemental damage to Zoh Shia. Given the frequency of crystal generation during attacks, creating elemental chain reactions becomes a viable strategy for dealing substantial damage. Both required slinger ammunition types can be crafted easily using Wyrmsbane and Thundercryst materials that spawn within the arena.
Combat Strategy and Phase Breakdown
Preparation and Positioning
Equipping gear with high Fire and Thunder resistance proves crucial. Blight Resistance becomes particularly valuable through Guardian Arkveld armor pieces or Blight Charm talismans. Positioning underneath the creature near its back legs offers the safest combat zone throughout most of the encounter, though damage output remains limited from this position. The evolving attack patterns eventually force hunters from this refuge.
Phase One: Crystal Armor
Zoh Shia begins completely encased in white crystal armor. Attacks become more effective after breaking this armor, though it regenerates over time. Proper dodge timing and mounting attempts work well during this phase. Opening four wounds along the creature’s back typically proves achievable with adequate time management.
Phase Two: Fire Awakening
The second phase commences when head armor breaks away, revealing a black head capable of fire attacks. Hunters must avoid deceptively swift fireballs and area-denial attacks that ignite everything beneath the creature. Crystal triggering becomes possible from this point, enabling large-scale explosions. Proactive crystal detonation accelerates armor destruction.
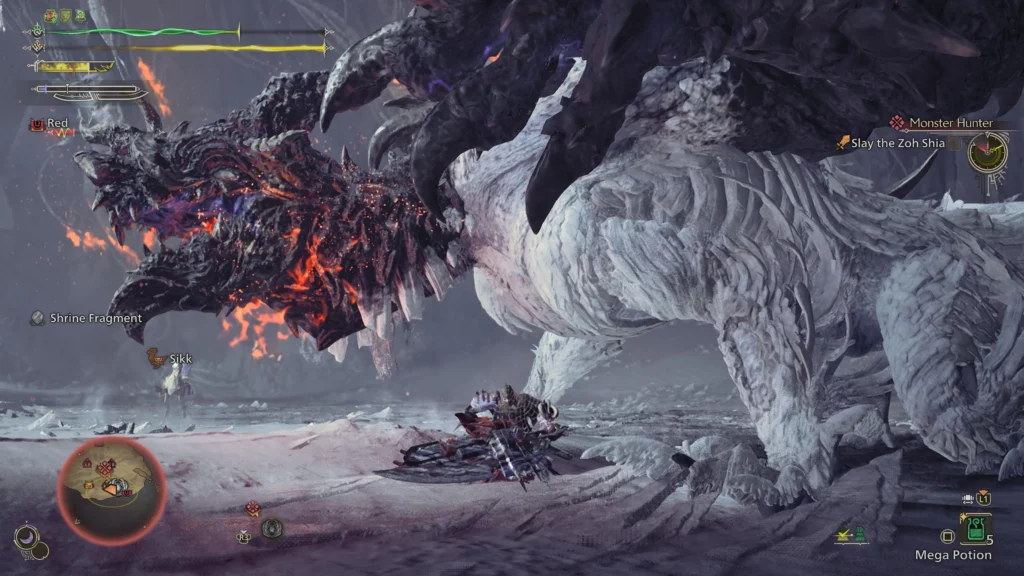
Phase Three: Wing Liberation
The third phase begins dramatically as Zoh Shia flies to the arena’s front and lands with tremendous force. Massive crystals emerge from the ground as wing armor falls away. Unlike Jin Dahaad encounters, these crystals provide no protection. The heated creature ignites all crystals, spreading fire across nearly the entire arena. Premature crystal detonation using slingers creates safe zones free from fire damage.
This phase introduces increased burning attacks and falling fiery debris. Hunters find themselves dodging more exploding crystals than triggering them strategically. Smaller versions of the phase-opening attack may occur, best avoided by maintaining maximum distance or positioning directly behind the monster.
Phase Four: Complete Revelation
The final phase reveals Zoh Shia’s entire black form. Beyond relentless fire attacks and debris, hunters face sideways lightning blasts and random lightning strikes. Any attack can trigger crystals, potentially ending hunts prematurely. Proactive crystal triggering and attack avoidance become paramount. Destroying the two hanging shrine fragments on arena sides proves particularly effective during this dangerous final stage.
Coordinated teams significantly reduce hunt difficulty. Success with random hunters remains achievable, though crystal mechanic awareness often appears limited among teammates.
Zoh Shia Drop Rewards
Defeating this formidable opponent yields valuable materials for crafting exceptional armor and weapons. Reviewing Zoh Shia’s monster information tabs helps determine optimal farming strategies for specific components. The complete drop list, arranged by frequency:
- Zoh Shia Stakeclaw (100% chance from breaking either foreleg)
- Blackember Mass (100% chance from breaking either wingarm)
- Zoh Shia Crystalhorn (100% chance from breaking the head)
- Zoh Shia Crystaltail
- Guardian Blood +
- Zoh Shia Crystalscale
- Zoh Shia Layershell
- Zoh Shia Certificate S
- Faux Whitegleam Orb
Conquering Zoh Shia represents a significant achievement worthy of pride. While Tempered Mizutsune fights offer comparable intensity, no encounter matches the epic scale and satisfaction of a successful Zoh Shia hunt.